Thursday, 31 March 2011
How to retrieve the optionset text / value using javascript in CRM 2011 OR How to get the optionset text / value in CRM 2011
Code snippet:
var myOptionSet = Xrm.Page.data.entity.attributes.get("optionsetattributename");
var optionSetValue = myOptionSet.getValue();
var optionSetText = myOptionSet.getText();
How to retrieve lookup text value / id using Javascript in CRM 2011 OR How to get lookup text value / Id in CRM 2011
Related Post: How to retrieve lookup attribute from Plugin in CRM 2011
http://crmdm.blogspot.com/2011/06/how-to-retrieve-lookup-attribute-from.html
Code Snippet:
http://crmdm.blogspot.com/2011/06/how-to-retrieve-lookup-attribute-from.html
Code Snippet:
var lookupObject = Xrm.Page.getAttribute("yourlookupattributename");
if (lookupObject != null)
{
var lookUpObjectValue = lookupObject.getValue();
if ((lookUpObjectValue != null))
{ var lookuptextvalue = lookUpObjectValue[0].name;
var lookupid = lookUpObjectValue[0].id;
}
}
Wednesday, 30 March 2011
How to retrieve Checkbox value in CRM 2011 using Javascript / How to get Checkbox value in CRM 2011 using Javascript
The following code snippet is to retrieve the checkbox value in CRM 2011 using Javascript.
var myAttribute = "attributename";
var myControl = Xrm.Page.ui.controls.get(myAttribute);
var myCheckboxValue = myControl.getAttribute().getValue();
// returns True or false
// returns True or false
if (myCheckboxValue == true)
{
//Code- eg: hide or show a control
}
How to Hide / Show a Tab in CRM 2011 using Javascript OR Toggle visibility of Tab in CRM 2011
Code snippet to show or hide a tab on the entity form in CRM 2011 using javascript.
To hide a tab:
To show a tab:
Xrm.Page.ui.tabs.get("yourtabname").setVisible(true);
Xrm.Page.ui.tabs.get("yourtabname").setVisible(false);
How to Hide / Show a Section in CRM 2011 using Javascript OR Toggle visibility of section in CRM 2011
Code snippet to hide or show a section on the entity form in CRM 2011
To show a section :
To hide a section:
To show a section :
Xrm.Page.ui.tabs.get("yourtabname").sections.get("your section name").setVisible(true);
Xrm.Page.ui.tabs.get("yourtabname").sections.get("your section name").setVisible(false);
Checkbox onChange event is not working properly in CRM 2011 OR Checkbox click Issue in CRM 2011
In CRM 2011, it was found that the checkbox is not working as per our expectation. As we all know, the twooptionset(bit field) attribute type is converted to a checkbox on the form. Now consider a scenario. When you tick or untick the checkbox we would like to execute some code (Say hide a control). But the code written in Onchange is not fired until we leave the checkbox. So if we click outside of checkbox or if we press tab button, then only code changes would reflect. Whereas our expectation is always an immediate change when we tick or untick the checkbox. The following workaround could be applied to the checkbox. This code could be written in any event which is prior to Onchange event of the checkbox. So obviously we should prefer OnLoad event of the form in most of the cases.
crmForm.all.yourattributename.onclick = function () {
crmForm.all.yourattributename.FireOnChange();
};
Eg: If you have a checkbox called new_mycheckbox then
In Page Load (OR any event which happens before Onchange of checkobx) write this code
crmForm.all.new_mycheckbox.onclick = function () {
crmForm.all.new_mycheckbox.FireOnChange();
};
and then write the code (hide control or whatever ...) in OnChange event of checkbox
Wednesday, 23 March 2011
How to add a new navigation link / Custom navigation link on the entity form in CRM 2011
In CRM 2011 its possible to define a new left navigation link on the entity form. The new left navigation could be linked in 2 ways.


Please don't forget to Save and Publish once you complete the above steps. Lets go to see the outcome.

Now we would try the second option. So prior to that we should upload a page to the web resources. Lets upload a sample HTML Page. This page will be linked with the left navigation.


1. As an external URL
2. As a webresource ( could be HTML Page, Silverlight page etc)
So let's go through each of these.
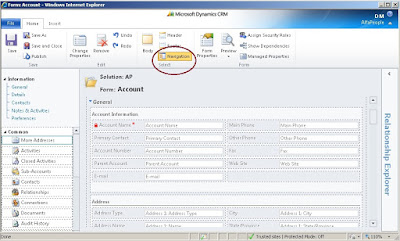
As you all know, the left navigation could be enabled by choosing Navigation button on the Entity Form Ribbon as shown below.
Now let's choose the Insert tab and click on the button 'Navigation link'.

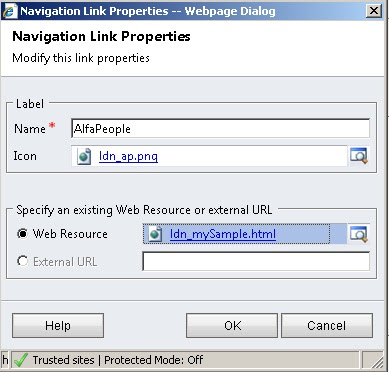
This will result a pop up window as shown below.

There is a provision to choose the Icon as well. However this Icon must be retained in the web resources. So lets try the external URL option first.


Now we would try the second option. So prior to that we should upload a page to the web resources. Lets upload a sample HTML Page. This page will be linked with the left navigation.

Please note the difference.
Here we go...

The key advantage is that we could define our custom pages, in the sense whatever pages supported in the web resources. And when we click on the left navigation, these pages could be loaded on the entity form as shown.
Related Article : Editing form left navigation in CRM 2011
Monday, 21 March 2011
Plugin Deployment in CRM 2011 - Best Practices
As you all know, the new concept called 'Solution' which bundles the components was introduced in CRM 2011. Solutions could help us to deploy plug-ins in a very good manner. If you open a solution in CRM 2011 you could find out a section called 'Plug-in Assemblies'.

Now consider a scenario that we have a plug-in called myPlugin with steps Create and Update of Contact Entity. So let's register the plugin using the CRM 2011 Plugin Registration tool.

Once its registered, it would be available in our solution. So navigate to Plug-in Assemblies section of the solution and click on 'Add Existing button' . Then you would get the following window. All registered plugins would be listed here.

We could choose the plugin and then click OK.

So our plugin is added to the solution as shown above. So this is how we bundle the plugin in the solution. However its a very good practice to bundle the steps of plugin too. So lets consider the following 2 steps to be bundled in the solution.
Create Contact & Update Contact steps

So navigate to 'Sdk Message Processing Steps' section of our solution which could be found just below the 'Plug-in Assemblies' section. And click on add existing option.

Choose the message steps as shown and then click OK.

As you could see the plugin message steps are added to the soultion.

Very Important step: Select the steps and click on Activate Button. Please don't forget this step
The key advantage of this practice is when you move the solution to another server for instance from development server to the production server, you don't need to deploy the plugins again. Because the plugins and steps are already wrapped with solution.
Related article: How to use ILMergeThe key advantage of this practice is when you move the solution to another server for instance from development server to the production server, you don't need to deploy the plugins again. Because the plugins and steps are already wrapped with solution.
http://crmdm.blogspot.com/2011/02/crm-cannot-find-plugin-assembly-or-one.html
Wednesday, 16 March 2011
Intellisense in Customizations.xml file - CRM 2011 / Easy way to edit Customizations.xml file in CRM 2011
As you all know, customization plays a major role in MS Dynamics CRM. Sometimes we may confuse with tags in the Customization file. Hence intellisense is very helpful to speed up the editing process of Customization.xml file. To bring intellisense we just need to follow some simple steps.
Firstly download the latest SDK for MS Dynamics CRM 2011 and extract to a local folder. If you open the SDK folder you could find a folder called Schemas. This folder contains a few XML schemas. If we include these schemas in Visual studio, we will have intellisense for the Customizations.xml file.
So let's do it.
Go to Visual studio and choose XML tab and then select Schemas as shown below.
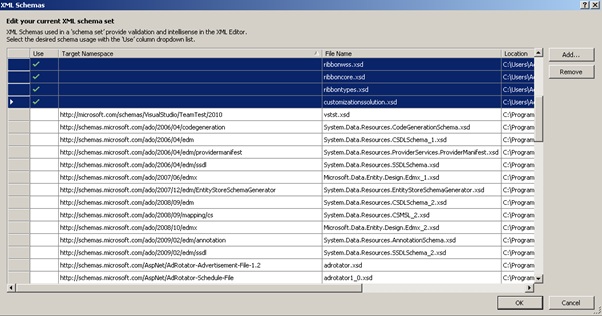
You could see a XML Schemas window. Click on the add button.

Extension of Schema files is .xsd. Choose customizationssolution.xsd and 3 xsd files which starts with the name ribbon as shown.

Add them to the existing XML Schemas as shown. And the click OK.
Here we go...
Note: Ctrl+ Spacebar - For Intellisense


Please remember to follow the order. For instance as shown above, Inside <CustomActions> tag we have <CustomAction>. Hence Intellisense will show you<CustomAction> only if you get inside <CustomActions>.
Intellisense in Customizations.xml will save your valuable time.
Related article : How to place a custom button on the application ribbon of MS Dynamics CRM 2011
Tuesday, 15 March 2011
How to retrieve current Locale ID of the User /Organization in CRM 2011 using Javascript / How to retrieve current Language Code / LCID of the User in CRM 2011 using Javascript
In MS Dynamics CRM 2011, Locale ID represents the current Language Pack of the User. It would be the preferred language of the current User.
For Instance, LCID of Italian Language is 1040
LCID of Japanese Language is 1041
Current LCID of the user could be retrieved using Javascript with the following code snippet.
var userlcid= Xrm.Page.context. getUserLcid();
Also LCID of the base language for the current Organization could be retrieved using the following code snippet.
For Instance, LCID of Italian Language is 1040
LCID of Japanese Language is 1041
Current LCID of the user could be retrieved using Javascript with the following code snippet.
var userlcid= Xrm.Page.context. getUserLcid();
var orglcid= Xrm.Page.context. getOrgLcid();
"Delete event is not fired in CRM 2011" / "Delete event is not working in CRM 2011"
Have you ever faced the above issue? If so lets figure out why its happening? In simple words the Villian is context.InputParameters["Target"]
context.InputParameters["Target"] is EntityReference) // Code to be executed during Delete event
context.InputParameters["Target"] is Entity)
Delete event -> Type of context.InputParameters["Target"] is EntityReference
Create event / Update event ->Type of context.InputParameters["Target"] is Entity
In a nutshell,
context = (IPluginExecutionContext)serviceProvider.GetService(typeof(IPluginExecutionContext));
if (context.InputParameters.Contains("Target") &&
{
if (context.MessageName == "Delete")
{
}
}
Whereas Create / Update events work as follows
context = (IPluginExecutionContext)serviceProvider.GetService(typeof(IPluginExecutionContext));
if (context.InputParameters.Contains("Target") &&
{
if (context.MessageName == "Create")
{
//Code to be executed during Create event of an entity
}
if (context.MessageName == "Update”)
{
//Code to be executed during Update event of an entity
}
}
Please note the key difference Entity and EntityReference
How to use a common plugin for Create / Update /Delete events
Its possible to use a common plugin to handle Create / Update / Delete events of an entity.
Code snippet:

Code snippet:
context = (IPluginExecutionContext)serviceProvider.GetService(typeof(IPluginExecutionContext));
if (context.InputParameters.Contains("Target") &&
context.InputParameters["Target"] is Entity)
{
if (context.MessageName == "Create")
{
//Code to be executed during Create event of an entity
}
if (context.MessageName == "Update”)
{
//Code to be executed during Update event of an entity
}
}

MessageName is assigned when we create step by using Plugin registration tool as shown.
Above code shows how to differentiate between the Create and Update events.
Delete event works in a different way. Please refer the following link
http://crmdm.blogspot.com/2011/03/delete-event-is-not-firing-in-crm-2011.html
http://crmdm.blogspot.com/2011/03/delete-event-is-not-firing-in-crm-2011.html
Monday, 14 March 2011
How to set order for the plugins which share common trigger event in CRM 2011
When we use plugins in MS Dynamics CRM, sometimes we may need to use more than one plugins with common trigger event. In order to handle this scenario, we have a property in Plugin Registration tool. Its called 'Execution Order'. So the plugins which share same trigger event could be assigned with a Execution order. Execution Order numbering starts from one. Even if all the plugins share the common trigger event, the Plugin with Execution order 1 would be executed first and then the rest. Hence we could decide this order according to our requirement.
For Instance,
Imagine that we have two plugins
1.Plugin : AssignOwner
2.Plugin : Calc
Both of these must be fired when we create a contact and also as Pre-Operational.
But as per our requirement we decide that Plugin 'Assign Owner' should be executed first and then 'Calc'
So it could be done while defining the step.

Tuesday, 8 March 2011
How to Change Icons of a custom Entity in MS Dynamics CRM 2011
MS Dynamics CRM 2011 provides a very cool feature to change the icons of a custom entity. This method is very simple and no coding required for this. Webresources utility plays a major role for the same.
So we are going to create a new entity and let's see how this feature works.
Lets kick off by creating a custom entity called 'AP'


So we are going to create a new entity and let's see how this feature works.
Lets kick off by creating a custom entity called 'AP'

Once its created, we could go solutions and choose the our newly created entity. At the top you could see a button called Udate Icons.

Note:There 3 types of Icons to be assigned (Each of them not more than 10KB)
1. 16x16 pixels --This Icon will be placed in Web Application
2. 32x32 pixels --This Icon will be placed as the shortcut icon in the MS Office Outlook
and finally
3. 66x48 Pixels --This Icon will be placed on the entity form
1. 16x16 pixels --This Icon will be placed in Web Application
2. 32x32 pixels --This Icon will be placed as the shortcut icon in the MS Office Outlook
and finally
3. 66x48 Pixels --This Icon will be placed on the entity form
The key advantage of MS Dynamics CRM 2011 is that it provides us the webresouce utility to store all these Icons. So first we need to store all these Icons in the webresource so that we could refer them later. Its ideal to name each icon with some identifier. For instance to identify 16x16 pixels we could name it as myicon16.png. This will provide more readability. However this is not mandatory but just a suggestion.

So all the three icons could be uploaded in the same way.

Now lets navigate to the entity and choose the update icons option.

Click on the lookup to choose the file from webresource

Once all the Icons are selected click OK and publish the entity and see the magic.

We don't need to edit the sitemap and also its very easy to do. But remember System entities doesn't have this option.
Thursday, 3 March 2011
How to use Global Option set / Picklist in MS Dynamics CRM 2011
One of the attractive features in MS Dynamics CRM 2011 is Global Option sets. Global option sets are reusable in all entity forms. So let's try it.
Lets consider a scenario. We would like to use an option set attribute say Validity Range on many entity forms. In simple words, we need to define this option set globally and then attach it the attribute on the form. Global option set could be found in when you expand the Solution as shown below.


Lets consider a scenario. We would like to use an option set attribute say Validity Range on many entity forms. In simple words, we need to define this option set globally and then attach it the attribute on the form. Global option set could be found in when you expand the Solution as shown below.

Choose New option to define a new Global optionset.

Suppose we would like to reuse this option set on the contact form. So lets traverse to Contact entity and choose fields.

Choose 'New' to add a new attribute.

Choose the Type as Option set. Here comes the twist. You could see an option 'Use existing option set'. This determines whether we are going to use the global option set or a new one. Also please note that the form layout change when you choose 'Use existing option set' to Yes.

Another key advantage of this feature is that we are able to define 'Requirement Level' in our new attribute as per our choice. At the same time we could reuse the values from the Global Option Set.
Tuesday, 1 March 2011
How to Filter a Picklist / Option set based on another Picklist / Option set using Javascript in MS Dynamics CRM 2011
The following post was done long time back. So please refer this link http://msdn.microsoft.com/en-us/library/gg594433.aspx
//Please refer the above link
In MS Dynamics CRM 2011, it is possible to filter a picklist based on another. Javascript would be an ideal method to achieve this.Lets consider that we have two pick lists - picklistOne and picklistTwo. So when we choose a value from picklistOne, the other one should populate values based on this.
Its a good way to design the picklist values prior to do this. In the following picture, the first rectangle represents picklistOne and next one represents picklistTwo. The advantage of this design is we could easily identify related items of first picklist by looking at the fist 3 digits.
For Instance, item 10001,10002 are identified as the related item of 100

For instance, first picklist could be populated with days,months and years. Hence the related values of the same would be displayed in the next picklist based on the selected value of the first picklist.
Defining the picklist options:

Next part is to write a function to filter items of second picklist based on the selected item of the first picklist.
function PicklistOneOnchange() {
var picklistOneAttribute = "new_picklistone";
var picklistTwoAttribute = "new_picklisttwo";
var picklistOne = document.getElementById(picklistOneAttribute);
var picklistTwo = document.getElementById(picklistTwoAttribute);
var picklistOneSelectedValue = picklistOne.DataValue;
if (picklistTwo.flag == true) {
//a varibale originalPicklistValues is used to retain
// the original values of the picklist
// the original values of the picklist
picklistTwo.Options = picklistTwo.originalPicklistValues;
}
else {
picklistTwo.originalPicklistValues = picklistTwo.Options;
picklistTwo.flag = true;
//flag-to identify when the original picklist values to be reassigned
}
if (picklistOneSelectedValue != null)
{
for (var i = picklistTwo.length - 1; i >= 0; i--) {
if (picklistTwo.Options[i].DataValue != null && picklistTwo.Options[i].DataValue != "") {
if (picklistTwo.Options[i].DataValue.substring(0, 3) != picklistOneSelectedValue)
{
picklistTwo.remove(i);
//removes unrelated items and displays only related items.
}
}
}
}
}
Subscribe to:
Posts (Atom)