Saturday, 19 August 2017


Thursday, 10 August 2017
How to Create an Azure Bot using QnA Service
One of the cool features I explored with Azure is Azure Bot Service. Lets see how to create a simple Azure Bot using QnA Maker service. The key concept is that QnA maker service extracts the data from the Frequently Asked Questions (FAQ) sites and use this info as the knowledge base for the Azure Bot. For instance :https://www.microsoft.com/en-gb/software-download/faq
If you dont have any FAQ URLs then you could upload a file containing your question and answer pairs. QnA maker can extract data from these too.
The supported file types are
Sample file from Microsoft QnA maker is pasted below.
How many alphabets are there in english? There are 26 alphabets
How many words are there in english? There are so many words
How many languages are there in the world? Count less
What is your mother tongue? binary
Remember Microsoft QnA Maker is fee and very easy to use.
So let's do it. To make it easy, make sure that you use same azure account for the QnA service as well.
Here is the link to the QnA Maker.
https://qnamaker.ai/
To create a new qna service click on the Create new Service as shown below.

Fill in the info as shown below. Feel free to choose your faq site and also files if you prefer.

Click on the Create button as shown below. Yes we are halfway through.

If you wish to create a new Question answer pair you could do that by click on the add new QnA pair button.

The newly added Question answer pair is shown below. Once you are happy with the content, click on the publish button on the top right corner.

Click on Publish to confirm.

After publish you would see message show the service has been deployed.

Now lets navigate to Microsoft Azure.
New -> Data+ Analytics->Bot Service ( Depending on the Azure versions, navigation might be slightly different).

Create a new bot service as shown below. You would see a notification that the deployment is in progress.

Once the deployment is finished, nagivate to app service and choose the bot you just created. The next bit is the registration of the bot. So click on the Create Microsfot App ID and pwd button. This will take to a new window. When its prompted, copy the pwd. Then you could navigate back to the previous screen. When you try it you would understand how simple step is this.

Select the Question and Answer bot after entering the App ID and password. Then click on the Create bot button.

If you have used same account for QnA service and Azure then you could easily select your QnA service that you created as shown below. Click on the OK button after that.

Your bot is on the way : )
Click on the test button for a quick test.

So here is our first test results. In simple words, Q and A pairs were extracted from the QnA service and linked with our newly created bot.

Now lets see how do we bring our bot to skype.
So this concept is called Channel. A channel could be Skype, Facebook messenger, Skype for Business, Kik etc.
For instance, lets see skype channel.
So navigate to Channel section as shown below. Please note the highlighted button 'Get bot embed codes'.

This will popup a link to join the skype.
For instance, https://join.skype.com/bot/yourguidgoeshere

Now if you copy this URL and paste on your browser ( assuming that the Skype is logged in )
you could see a popup to add a new contact to skype.

That's all. From now on you could chat to the Bot if you are bored ; - )

If you dont have any FAQ URLs then you could upload a file containing your question and answer pairs. QnA maker can extract data from these too.
The supported file types are
- .tsv,.pdf,.doc,.docx,.xlsx - each under 2 MB
Sample file from Microsoft QnA maker is pasted below.
How many alphabets are there in english? There are 26 alphabets
How many words are there in english? There are so many words
How many languages are there in the world? Count less
What is your mother tongue? binary
Remember Microsoft QnA Maker is fee and very easy to use.
So let's do it. To make it easy, make sure that you use same azure account for the QnA service as well.
Here is the link to the QnA Maker.
https://qnamaker.ai/
To create a new qna service click on the Create new Service as shown below.

Fill in the info as shown below. Feel free to choose your faq site and also files if you prefer.

Click on the Create button as shown below. Yes we are halfway through.

If you wish to create a new Question answer pair you could do that by click on the add new QnA pair button.

The newly added Question answer pair is shown below. Once you are happy with the content, click on the publish button on the top right corner.

Click on Publish to confirm.

After publish you would see message show the service has been deployed.

Now lets navigate to Microsoft Azure.
New -> Data+ Analytics->Bot Service ( Depending on the Azure versions, navigation might be slightly different).

Create a new bot service as shown below. You would see a notification that the deployment is in progress.

Once the deployment is finished, nagivate to app service and choose the bot you just created. The next bit is the registration of the bot. So click on the Create Microsfot App ID and pwd button. This will take to a new window. When its prompted, copy the pwd. Then you could navigate back to the previous screen. When you try it you would understand how simple step is this.

Select the Question and Answer bot after entering the App ID and password. Then click on the Create bot button.

If you have used same account for QnA service and Azure then you could easily select your QnA service that you created as shown below. Click on the OK button after that.

Your bot is on the way : )
Click on the test button for a quick test.

So here is our first test results. In simple words, Q and A pairs were extracted from the QnA service and linked with our newly created bot.

Now lets see how do we bring our bot to skype.
So this concept is called Channel. A channel could be Skype, Facebook messenger, Skype for Business, Kik etc.
For instance, lets see skype channel.
So navigate to Channel section as shown below. Please note the highlighted button 'Get bot embed codes'.

This will popup a link to join the skype.
For instance, https://join.skype.com/bot/yourguidgoeshere

Now if you copy this URL and paste on your browser ( assuming that the Skype is logged in )
you could see a popup to add a new contact to skype.

That's all. From now on you could chat to the Bot if you are bored ; - )

Basics of Azure Service Bus- Queues, Topics ( - Subscriptions) & Relays
If you want to understand the basic knowledge of Azure Service Bus -Queues , Topics ( - Subscriptions), Relays concepts, I would recommend the below link
These concepts are clearly explained in here.
https://docs.microsoft.com/en-us/azure/service-bus-messaging/service-bus-fundamentals-hybrid-solutions
Found an amazing tool to play around Azure Service Bus -Queues , Topics ( - Subscriptions), Relays as well. Its called The service bus explorer.
These concepts are clearly explained in here.
https://docs.microsoft.com/en-us/azure/service-bus-messaging/service-bus-fundamentals-hybrid-solutions
Found an amazing tool to play around Azure Service Bus -Queues , Topics ( - Subscriptions), Relays as well. Its called The service bus explorer.
Ref: “The Service Bus Explorer allows users to connect to a Service
Bus namespace and efficiently administer messaging entities. The tool provides
advanced features like import/export functionality or the ability to test
topic, queues, subscriptions, relay services, notification hubs and events
hubs”
Using this tool, I tried sending messages to Service bus queues. It works like a charm. You could also send multiple messages ( For instance, 100 messages, 1000 messages if you prefer to test in that way). The advantage is that you dont need to develop another application to test sending messages to the Azure service bus queue / topic / relays.
Tuesday, 2 February 2016
How to Export Custom Views in Dynamics CRM
I was looking for a way to export the custom views from one environment to another ( Version used both source and target -CRM 2015 On-Premise ) and found this nice tool. Its a great time saver.


Scenario: Created some custom views in UAT environment in order to support testers. Now we need to move same views to the PROD environment.
Note: One thing I noticed was while using this tool, the person who is trying to export the views should be the owner of the views. If someone has shared any views with you, then you might need to do a 'Save as' and then try to export that view. Otherwise this tool might throw error.
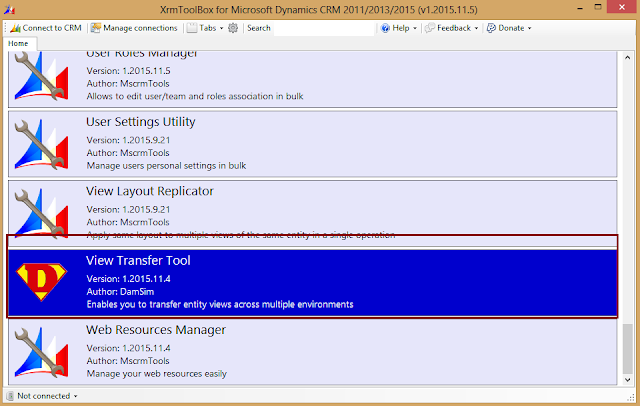
Xrm Tool box provides a nice tool to export custom views. Download link of the tool is given below.
http://www.xrmtoolbox.com/download.html
1.After download, extract the zip file to a custom folder.

2. Then choose View Transfer Tool.

3. Next step is to connect to the organization. The user interface is pretty simple. We need to select source and target as shown below. After this we could choose entity and then the view to be transferred. Then just click the button Transfer views.
Note: Its highly recommended to test and verify the same view in the new environment.

Thanks to Xrm Tool Box !
Monday, 25 January 2016
Whats new in CRM 2016
With reference to Microsoft Dynamcis CRM Help and Training website, there will be some cool features along with CRM 2016.
Some interesting features are Preformatted templates for creating excel templates, Onedrive for business directly from CRM, changing colour scheme using Themes, email folder tracking, Survey ( this is cool one ) . And we will be able to export up to 100000 records using excel export in Dynamics CRM 2016.
For further details please check the link below.
https://www.microsoft.com/en-us/dynamics/crm-customer-center/what-s-new.aspx
Some interesting features are Preformatted templates for creating excel templates, Onedrive for business directly from CRM, changing colour scheme using Themes, email folder tracking, Survey ( this is cool one ) . And we will be able to export up to 100000 records using excel export in Dynamics CRM 2016.
For further details please check the link below.
https://www.microsoft.com/en-us/dynamics/crm-customer-center/what-s-new.aspx
Sunday, 10 January 2016
Remote Desktop Connection Manager
Sometimes we might need to work in multiple Dynamics CRM projects at the same time. It may not be that easy to switch between servers of customers and progress our work. Also its not easy to remember the connection details, logins etc. I would recommend to use Remote Desktop connection manager to connect to various client servers. I got appreciation from my manager that I am well organized when he noticed that I use Remote Desktop connection manager for various servers. Well its a good time saver. Just imagine how long it takes to connect to each servers or finding connection details etc. Highly recommended when you need to handle multiple clients at the same time. The key point is its really easy to switch from one customer to another. And finally its a free tool from Microsoft.
https://www.microsoft.com/en-gb/download/details.aspx?id=44989
Its not a tough nut. You could easily play around and practice more. If you right click and select properties, you could configure logon credentials etc for each server. For instance, Customer 2 Dev represents server connection whereas Customer1 is a group.

Saturday, 12 December 2015
How to Extract Dynamics CRM Fields to an Excel Sheet
This post is about how to extract Dynamics CRM fields into a Microsoft Excel sheet. We might need this info for data migration / integration tasks. For instance mapping of Dynamics CRM fields against an old system from which we need to migrate / integrate data.
Xrm Tool box provides a tool with this feature. Download link is given below.
http://www.xrmtoolbox.com/download.html
1.After download, extract the zip file to a custom folder.

2. Open the XrmToolBox.exe. Choose Metadata Document Generator

3. Next step is to connect to the organization. So click yes.

4. Create a new connection by clicking on the New Connection button.

5. Create the connection with your CRM server / Online version details.

6. Once connected, Xrm tool box loads all the entities. Now choose your entity or all entities as per your requirement. Please note the highlighted buttons. Click on Generate document button after choosing the options.

7. Thats it really. You could find your excel document with chosen attributes in the chosen folder.
Thanks to Xrm Tool Box !
Xrm Tool box provides a tool with this feature. Download link is given below.
http://www.xrmtoolbox.com/download.html
1.After download, extract the zip file to a custom folder.

2. Open the XrmToolBox.exe. Choose Metadata Document Generator

3. Next step is to connect to the organization. So click yes.

4. Create a new connection by clicking on the New Connection button.

5. Create the connection with your CRM server / Online version details.

6. Once connected, Xrm tool box loads all the entities. Now choose your entity or all entities as per your requirement. Please note the highlighted buttons. Click on Generate document button after choosing the options.

7. Thats it really. You could find your excel document with chosen attributes in the chosen folder.
Thanks to Xrm Tool Box !
Subscribe to:
Posts (Atom)