"тнιѕ вℓσg ¢συℓ∂ ѕανє уσυя мσηєу ιƒ тιмє = мσηєу" - ∂.мαηנαℓу

Monday, 22 March 2021

Dynamics 365 CRM Diagnostic Tests / NFR Testing

 Dynamics 365 CRM provides an out of the box diagnostics test option. This could be useful if there is a requirement to test the NFRs ( Non-functional Requirements) against Dynamics 365 CRM. If you are not familiar with NFRs here is a simple definition for you

"Non-functional testing is done to verify the non-functional requirement of the application like Performance, Usability, etc."

Ref: https://www.softwaretestinghelp.com/what-is-non-functional-testing/


Navigate to this url -https://myorg.crm.dynamics.com/tools/diagnostics/diag.aspx

Note : myorg should be replaced with your organisation name.

Here is a sample run on my D365 CRM trial organisation. And yes, just need to click on that Run button!


 Here is the sample result.


Ref: Microsoft Documentation

https://docs.microsoft.com/en-us/power-platform/admin/verify-network-capacity-throughput-clients


Monday, 8 February 2021

Set up Azure Function with Blob Trigger

If you are not familiar with Azure Blob, please refer this post

https://crmdm.blogspot.com/2021/02/automate-file-copy-to-azure-blob.html

In this post, we will see how to set up an azure function with blob trigger. 

Assumption is that a blob is already set up as explained in the above post. 

So we already have storage account , storage container set up. When a blob is copied into the storage container, azure function gets triggered.

 Let's create an Azure function with Blob trigger from the Visual studio. Here I have used Visual studio 2019. Choose azure function from the templates.

Next step is to name the project.


It's time to choose the trigger! Please note the highlighted points. Blob trigger is what we need in this context. Path is the container name. For now, let's put mycontainer and later this can be updated with the value from the Azure. Also connection as MyBlobConnection. This can be mapped to the value from Azure later. So let's click on Create.


Rename function name to the preferred name.


 Let's define an entry for the connection string. This can be created in local.settings.json as shown. The same values can be configured in the deployed version.


So below are the two items needed from the Azure side.

  • Connection to Azure Blob
  • Container Name  

So let's see how to get these values from Azure. Navigate to the configured Storage Account and choose Access Keys. Click on the Show Keys button. It reveals the Blob connection ( Storage Account ) string. Copy this value.


Next bit is the container name

 
Local.settings.json is updated with the connection string from Storage Account.


Azure Function is updated with the container name as well.


We are good to go. Function gets triggered as soon as a blob is added to the storage container.


Inside Azure function you could write additional logic like calling an API, Writing to a SQL Database etc. depending on your requirements.


Sunday, 7 February 2021

Automate a File Copy to Azure Blob

Azure Blob is an object storage solution from Microsoft. It's mainly used for storing unstructured data like files, pictures etc. Blob security is important. So if you have a security team, it is highly recommended to discuss with them before you implement blob based solutions. Views are my own.

Azure blob is pretty cheap storage too - https://azure.microsoft.com/en-gb/pricing/details/storage/

Here is a diagram from Microsoft to understand the folder structure. Storage can have multiple storage container and can have multiple blobs in each. 

(ref:https://docs.microsoft.com/en-gb/azure/storage/blobs/storage-blobs-introduction)

As per the diagram img001,img002 and mov1 are blobs. In this sample scenario, it would be just a csv file.

In a very simple scenario it is just one storage account and storage container and a blob ( csv file) in it. I have a diagram for this scenario.


 Scenario: A file is located in a server. We need to copy it securely to Azure blob using a batch file. And then automate it.

 Let's begin!

Create a storage account from the azure portal.Navigate to https://portal.azure.com/ and search for Storage accounts. Click New. Account kind is your choice. Here I chose BlobStorage as I just need to store a file in the storage. File becomes the blob in this scenario.


 This displays a screen saying it is ready to create after the validation is passed. If the details are fine, click on the create button.

Deployment in progress screen, just be patient / get a coffee : )
 

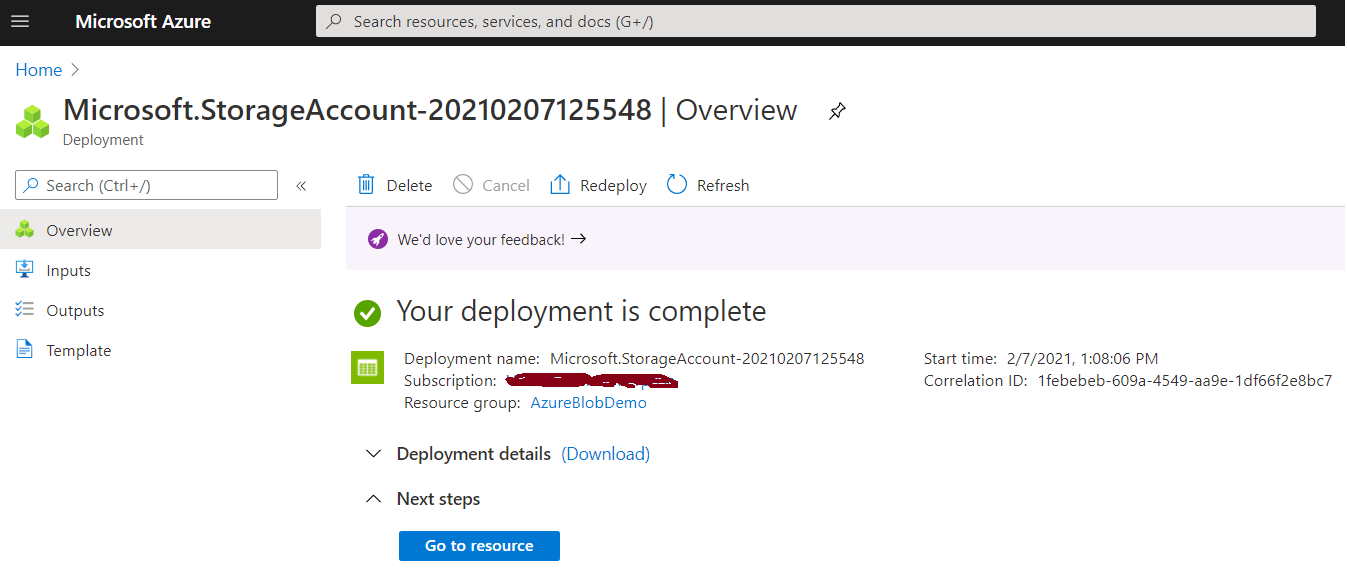
Good news ! Deployment is complete.

Next step, view the storage account.


 Security setting on the storage account level is very important. It is ( kind of hidden ) under the configuration blade. Important thing is that by default is enabled ( Honestly I didn't like the fact that default is enabled). So it is important to disable it if you don't want give public access to your storage account. And save that setting!


Next step is to create a container. Select the container section.

Click on the + button to create the container.

 Choose a name for the container and as you could see, because we disabled public access, it is reflected to the container level too. It is good !

In the container you could manually upload a file and it is treated as a blob.


Now let's see how to upload it using batch file. As we made the storage account secure, we need a Shared Access Key in order to copy a file / blob to the container.


Important bits are 
  •   Select only the services you need. In order to copy a file the ones on the screen shot are enough
  • Expiry date of the SAS key can be chosen. Shorter the better but remember to update it accordingly. Otherwise entire service would be blocked. So it is important to manage it correctly. SAS key would be valid until this date.
  • Make sure HTTPS is selected. Ip of the server - Upto you. It would make it more secure.

SAS token is the main bit. Copy it somewhere safe.


Next is AzCopy - AzCopy is command-line utility from Microsoft.It can be downloaded from the below link. And extract to the preferred folder.

https://docs.microsoft.com/en-us/azure/storage/common/storage-use-azcopy-v10

Open command prompt. And navigate to the downloaded folder.

Here is a dummy command. demo.csv is a sample file ( contents do not matter in this context). The part from ? ( ie sv= onwards) is the SAS token from the storage account.

azcopy copy "C:\yourfolder\demo.csv" "https://yourstorageaccountname.blob.core.windows.net/yourcontainername/demo.csv?sv=2000-1-1&ss=b&srt=co&sp=w&se=1989-01-07T21:43:04Z&st=2000-01-07T13:43:04Z&spr=https&sig=gr1GZIkNueRiRaavLWiyzhsdilGyLikM4NN5HZYJZ68%3D"

Once executed, it shows a completed status if it is successful


And you could see a file in the storage container.

 
Blob URL can be found from the blob. 

It is worth testing this url from the browser. Because it is vital to make sure that this url can not be accessed publicly.


 Batch file is very similar to command line option . Key difference is that if we have % value in the SAS key token, then we need to replace % with %% otherwise it doesn't work as per the batch file format.

 azcopy_windows_amd64_10.8.0 folder is the extracted content from Microsoft. Below is the contents of the batch file.

echo off
Cd C:\yourfolder\azcopy_windows_amd64_10.8.0\azcopy_windows_amd64_10.8.0
azcopy copy "C:\yourfolder\demo.csv"

"https://yourstorageaccountname.blob.core.windows.net/yourcontainername/demo.csv?sv=2000-1-1&ss=b&srt=co&sp=w&se=1989-01-07T21:43:04Z&st=2000-01-07T13:43:04Z&spr=https&sig=gr1GZIkNueRiRaavLWiyzhsdilGyLikM4NN5HZYJZ68%%3D"

Save this contact as a file.bat For instance, CopyToAzureBlob.bat

 Batch file is useful because it can be easily used for automation. 

For instance, in a server, you could set it up in a task scheduler task. It can be executed based on a schedule. For instance, this batch file can be run everyday at 5.00 am. 

If you have a better way to schedule in your server, feel to try that way. This is just a way to do it.

 Open the Task Scheduler and create a task.

 
Choose a schedule according to your requirement. Here I have chosen to run daily at 5.00 am. Feel free to choose any additional settings if you prefer.

Choose the Actions and select the batch file created earlier.

All set! This task would run every day at 5.00 am. And it would copy the file (becomes blob in azure) selected to Azure storage container.


Sunday, 17 January 2021

Power Automate and Azure Service Bus Queue Use Case

As you all know Power Automate is really cool!  It has got a lot of connectivities. This post aims to focus on Power Automate and also a scenario in which it can be utilized.

Consider a scenario. Payments are managed by another system and no payment / bank details are stored in Dynamics 365 CRM. But still need the capabiltiy to update it occasionally from Dynamics 365 CRM. Power Apps can be very handy in this context. An embedded Power App ( Canvas App) in Model Driven App is used here to capture the details. It triggers a Power Automate ( Flow) from a button. And then Power Automate publishes an Azure Service Bus message to the queue ( Azure Topics are also supported here in complex scenarios). An Azure function listens to Azure Service Bus queue and it gets triggered when a message arrives in the queue. Please note that it could be a console app as well. I chose Azure function for demo purpose. Azure function calls APIs of payment system and the details get updated there.

Obviously there are other ways to do it. This is just one option. Service bus is known for it'd resilience and also it has other features like retry message mechanism etc.These are just some guidelines, feel free to update as per your requirement / scenario.

Here is a small diagram to understand this sample scenario.

There are plenty of posts about Embedded Power Apps which triggers a Power Automate. So I am skipping screen shots for those. Assumption is that there is a bank wizard Canvas App and user access it when bank details need to be updated. On submission a Power Automate gets triggered from the button.

 First things first! Let's create a Service Bus and a queue. 

Navigate to htts://portal.azure.com/ and choose create new Service Bus option. Here , I chose a basic pricing tier.


  Important part of the Service bus is of course it's connection. This is required to establish a connection. It is  found in the Shared Access Policy section.


Primary connection string is what we need.

   
Next part is the queue. Select the Queues section.

 
Let's call the queue as bankwizardq. Properies of the queue is left as it is. But this can be changed accordingly.
Service Bus has a cool feature in preview - Service Bus explorer. This bit is interesting because I used to use a third party tool for this (https://github.com/paolosalvatori/ServiceBusExplorer). Now Microsoft provides this feature within the service bus.
 
Messages can be viewed using the Peek button. Currently no messages available. But it is ready to receive messages.

At this stage, assumption is that an Embedded canvas app triggers a flow with 4 Parameter values. Skipping this, as there are plenty of posts about this part. 

Next part is the Power Automate. It has mainly 3 steps. PowerApps is the trigger point of this Power Automate. Compose step forms a Json message from the values sent across. Send Message step is for sending a service bus message.


 Session Id is set to a new guid but feel free to set whichever you prefer. Output of the compose message is set to the Content. 

Service Bus connection part is shown below. Service bus connection from the Shared Access policy is provided here.


 Power Automate is triggered from the Power App and a message is received in the queue.

Power Automate run sample is below.


 Next part is to have an Azure function to gets triggered as soon as the message arrives in the queue. As mentioned earlier this could be a console app as well.

From Visual studio select a new project and choose azure function


Choose Service Bus Queue trigger and provide queue name and connection string values. This can be updated later as well. At this point, just put myqueue and mySBConnection.

 
 Connection string is updated in loal.settings.json file.

Queue name is updated as bankwizardq in the function. Next step is to run the function using the run button. When a message arrives in the service bus queue, function gets triggered.


 Console window output is below.

Azure function can call Third party APIs to udpate the details / Udpate DB as per the requirements. These are guidelines only. As per your requirement, things change.